[筆記分享] 我如何在 Anaconda 上,安裝 TensorFlow 2.x,並開啟 GPU 加速
Evernote 網址: https://bit.ly/33K77F9
--------------
最近我正在台大計算機中心,教授「深度學習」這門課程。整門深度學習,用得最多的函式庫就是 TensorFlow 了。它可以用來建構深度學習所需要的「神經網路」架構,所以任一個深度學習工程師,都得要會安裝。
深度學習的開發環境很多!我個人偏好 Google Colab(線上環境)與 Anaconda(本地端環境)。Colab 的執行環境,Google 工程師已經幫你裝好了。你只要點擊 https://colab.research.google.com 就能用。比泡麵還簡單!但你也只能被動接受 Google 工程師幫你裝好的執行環境。畢竟「線上平台」彈性還是比「本地端平台」要小一點。
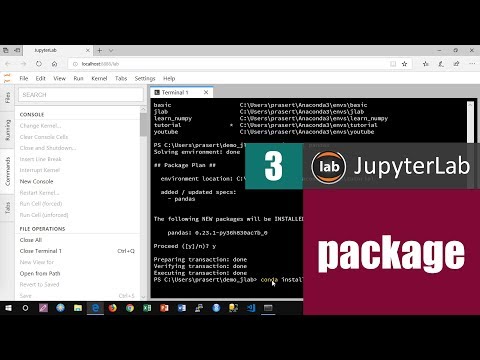
早期(TensorFlow 1.x 時期)要裝 TensorFlow,並開啟 GPU 圖形加速功能,只要開啟 Anaconda Prompt 命令列視窗,輸入下面這一行就可以了:
conda install tensorflow-gpu
但 TensorFlow 2.x 之後,Anaconda 並沒有把 conda 這個指令調整得很好。大家已經用到 TensorFlow 2.3 了,conda 安裝出來的最新版居然只到 TensorFlow 2.1。更慘的是,開啟 GPU 加速時,所需搭配的 cuDNN 函式庫與 CUDA Toolkit 版本,也跟 TensorFlow 2.1 這個版本衝得亂七八糟!總之,就是一堆同學裝不起來!機器空有獨立顯卡,但無法發揮 GPU 加速平行運算的能力!
有鑑於此,我今天早上就親自「試水溫」,想辦法找出這幾樣東西的排列組合,到底怎麼樣是對的:
Python版本 x nVidia驅動程式版本 x TensorFlow版本 x cuDNN 函式庫版本 x CUDA Toolkit版本
也順便找出最順暢的安裝流程,分享給大家。希望有需要的朋友能喜歡!
祝福大家都能釋放顯卡平行處理的威力,讓你跑神經網路時,硬是比別人快好幾倍!
有我說明不足的地方,歡迎在下方留言。不敢說一定有能力解決,但我會盡力的! :-)
PS: 本文歡迎轉發、按讚、留言鼓勵我一下!您的隻字片語,都是讓我繼續提供好物的動力喔!
--------
看更多的紀老師,學更多的程式語言:
● YOTTA Python 課程購買: https://bit.ly/2k0zwCy
● YOTTA 機器學習 課程購買: https://bit.ly/30ydLvb
● Facebook 粉絲頁: https://goo.gl/N1z9JB
● YouTube 頻道: https://goo.gl/pQsdCt
如果您覺得這個粉絲頁不錯,請到「評論區」給我一個好評喔!
https://www.facebook.com/pg/teacherchi/reviews/


install conda 在 Python Installation - Conda Install | Google Earth Engine 的解答
The Earth Engine Python API can be installed to a local machine via
conda, a Python
package and environment manager. Conda is bundled with
Anaconda and
Miniconda
Python distributions. Anaconda is a data science programming platform
that includes 1500+ packages, while Miniconda includes only conda and its
dependencies. Either of these Python distributions are suitable for
installing and working with the Earth Engine API. If you're unfamiliar
with these distributions, please visit their links to learn more.
This guide will direct you through:
Checking for an existing conda install
Installing conda on a local machine
Installing the Earth Engine Python API
Setting up authentication credentials
Testing the API
Note: The following steps will be completed in either a Windows
command prompt or Unix terminal (Linux/Mac). Use the tabs at the top of
each code section to switch to commands relevant to your operating
system.
Check for conda install
If conda is already installed on your system, skip to the
Install API section. If you are unsure whether conda is
installed, verify by entering the following command at your command line
interface.
conda --helpIf conda is installed and its system path is registered in the PATH
Install condaenvironmental variable, conda help contents should appear in the
terminal. If the help contents appear, skip to the
Install API section. If conda is not recognized, the
result will read something like:
conda not found or not recognized as a command. It is possible that the
program exists on your system but is not registered in the PATH
environmental variable. Even if this is the case, for consistency, please
continue with the Install conda section, as it is
difficult to address all possible system configurations. As long as the
folder 'miniconda3' does not exist in your Home folder, the following
conda install instructions should succeed. For more information on conda
install location and registration, please see the
Miniconda Installation
and Anaconda Installation
pages.
Note: Skip to the Install API section if conda is already
installed on your system.
In this section you will download and install Miniconda, which will serve
Install Minicondaas the Python platform to access the Earth Engine API. As
described above, you may use Miniconda or Anaconda, but to
minimize impact to your system, this guide will describe a
Miniconda installation with no alteration to your system's
environmental variables. If you prefer Anaconda, please see the
installation instructions provided
here and then skip to the
Install API section.
Downloading and installing Miniconda is accomplished in three steps:
Download the 64-bit Python 3 Miniconda installer to your Home directory
Run the installer
Delete the installer
Complete these steps by copying and pasting the following lines into the
appropriate command line interface for your system. Installation
results in a folder named 'miniconda3' added to your Home directory.
1. Download the Miniconda installer to your Home directory.
Linux
Mac
Windows
2. Install Miniconda quietly, accepting defaults, to your Home directory.
Linux
Mac
Windows
3. Remove the Miniconda installer from your Home directory.
Linux
Mac
Windows
Test Miniconda install
Print the
condacommand's help menu to test the Miniconda install.Since Miniconda has not been added to your system's PATH environment
variable, you will first need to activate conda for this session by
calling the
activatecommand by its full system path. A successful testwill result in
condahelp contents appearing in the terminal. Run thefollowing lines in your system's command line interface.
Linux
Mac
Windows
conda deactivate.Note: If the path to Miniconda is not set asan environmental variable, as in this case of this install, you need to
activate Miniconda for every new command line session in the future,
including use of the API. Use the first command from the above code
snippet to activate Miniconda as needed.
Add Miniconda to PATH variable
Caution: Altering your system's PATH variable can have unintended
consequences.
You can optionally add the Miniconda installation path to your system's
PATH variable, which will allow you to interact with conda by
a simple call to
condawithout having to first run theactivatecommand by its full path. The following instructions walk through adding
the Miniconda install to your system's PATH variable.
Linux
Add the following path to your 'PATH' environmental variable by
completing either the GUI or command line instructions below.
GUI$HOME/miniconda3/bin1. Open the
.bashrcfile found in your$HOMEdirectory in a texteditor.
2. Copy and paste the following lines to the bottom of the file.
3. Save the file and close the text editor.
Note: The added conda path can be removed by deleting the lines just
added.
Command line
Enter the following command in a terminal to append the conda path to
the
~/.bashrcfile.Mac
Add the following path to your 'PATH' environmental variable by
completing either the GUI or command line instructions below.
GUI$HOME/miniconda3/bin1. Open the
.bashrcfile found in your$HOMEdirectory in a texteditor.
2. Copy and paste the following lines to the bottom of the file.
3. Save the file and close the text editor.
Note: The added conda path can be removed by deleting the lines just
added.
Command line
Enter the following command in a terminal to append the conda path to
the
~/.bashrcfile.Windows
Add the following path to your 'Path' environmental variable by
completing either the GUI or command line instructions below.
GUI%UserProfile%\miniconda3\condabin1. Enter the following line in a command prompt to open the
'Environmental Variable' dialog.
2. Double-click the 'Path' variable under the 'User' section to select
it for editing.
3. Click the 'Edit text' button in the new 'Edit' dialog window to
open the editor.
4. Add the following string to the end of the existing 'Path' variable
value. Ensure that semicolons (;) surround the entry to distinguish it
from neighboring entries.
5. Click 'Okay' buttons until all dialog windows are closed.
Note: The added conda path can be removed following the same editing
method.
Command line
Use the
setxcommand to append the path. From a command prompt enter:changes to take effect.
Initialize conda
Initialize conda for shell interaction. Run the proceeding command for
information on initialization for various shells. Follow subsequent
instructions printed to the console upon entering the command.
After restarting your command line interface, you should be able to
Install APIactivate the base conda environment with the following command.
The Earth Engine Python API is distributed as a conda-forge package at:
https://anaconda.org/conda-forge/earthengine-api.
It is installed with the
conda installcommand. Before installing,however, make a conda environment specifically for Earth Engine.
Installing the Earth Engine API to its own environment ensures that it
and its dependent packages will not cause versioning issues with your
base environment or any other environment you've previously set up and
vice versa. For more information on managing conda environments, please
visit this site.
Note: The following first step assumes you have just completed the
Install conda section without altering environmental
variables or initializing conda for shell use; the command is structured
accordingly. If you have previously installed conda by another means or
have registered conda for use in the shell, please do what is necessary
to activate conda, then begin following instructions with step 2.
1. Activate your base conda environment, if it is not already.
Linux
Mac
Windows
2. Make a conda virtual environment for the Earth Engine API.
You will be asked to confirm creation of the environment, do so.
3. Activate the conda ee environment.
4. Install the API into the conda ee environment. Ensure that
(ee)appears at the beginning of the command line, indicating you are working
from the ee environment.
You will be asked to confirm the installation of the API and its
Get credentialsdependencies. After confirming, conda will download and install the
dependencies. If all goes well, you will now have a conda environment
called 'ee' with all the requirements for accessing the API, as well as
the
earthenginecommand line tool.Before using the Earth Engine API or
earthenginecommand line tool, youmust perform a one-time authentication that authorizes access to Earth
Engine on behalf of your Google account. To authenticate, use the
authenticatecommand from theearthenginecommand line tool.Within your conda ee environment run the following command and follow
the resulting printed instructions. A URL will be provided that generates
an authorization code upon agreement. Copy the authorization code and
enter it as command line input.
Upon entering the authorization code, an authorization token gets saved
to a credentials file which can be found below. Subsequent use of the
API's
ee.Initialize()command and theearthenginecommand line toolwill look to this file to authenticate. If you want to revoke
authorization, simply delete the credentials file.
Linux
Mac
Windows
Testing the API
Run a simple Python script that prints metadata for a DEM dataset to test
the API installation. It should print a JSON object to the console.
1. Start a
pythoninterpreter from your conda ee environment.2. Run the following Python lines one-by-one to print the metadata for a
Subsequent API useDEM dataset
Anytime you wish to use the Earth Engine API you must first activate your
Conda not registeredconda ee environment. The activation procedure depends on whether conda
is registered for use in the shell or not. Follow the instructions
relevant to your conda install below.
The following conda ee environment activation command assumes that
conda has been installed following the instructions in the above
Install conda section i.e. the install path is assumed
based on prior steps. Run the following command in a command line
interface.
Linux
Mac
Windows
Conda registered
The following conda ee environment activation command assumes that
conda has been registered for use in the shell or command prompt by
instructions in this guide or by other
means. Run the following command in a command line interface.
After running the command, you should see
(ee)at the beginning ofthe command line, indicating that you are working from the ee
environment.
You are now ready to start a Python interpreter and access the Earth
Updating the APIEngine Python API. Please refer to the
Python Install page for general guidance on
working with the Python API.
Use the
conda updatecommand to update your ee environment to thelatest API version. Remember to first activate your conda ee
environment, if it is not already active.
Get the currently installed version number in Python by printing the
Sharing your ee environmenteelibrary
__version__property. Start a Python interpreter by enteringpythonin the ee conda environment command line and then enter thefollowing commands.
It can be helpful to share your conda Python environment with others to
achieve reproducible and replicable results, particularly when you have
installed additional Python packages. Conda provides a convenient way for
others to replicate your environment.
From your conda ee environment, run the following command to save a
YAML file called 'ee-shared-env' to your Home directory, which lists your
environment specifications.
Linux
Mac
Windows
Share the resulting file, and the recipient can replicate the environment
by running the following conda command.
Note: The first line of the ee-shared-env.yml file defines the name of
the environment to be created. Conda will not overwrite an existing
environment, so the name of the environment in the ee-shared-env.yml
file may need to be altered. Alternatively, use conda's
removecommandor the
--cloneflag of conda'screatecommand to manage environmentnames.Note: Replicating environments across operating systems may fail, as
there are OS-specific package builds and versions that may not be
available or create dependency conflicts.
... <看更多>
相關內容